


how to ride the Tokyo metro

As you may know, in 2024-25 I've been living in Tokyo. Because I live here, I use the metro system a lot, as well as other kinds of public transport like buses and trains. I see so much online content about how to use the metro, but to be honest, it didn't actually prepare me for the first time I came here! So I thought I would put my knowledge to good use and create this guide. Let's go!
The question most people have is...
"What's the easiest way to get around Tokyo?"
Well, the easiest way to get around Tokyo is by taxi. However, that's also the easiest way to burn a hole in your pocket. The easiest way to affordably get around Tokyo is: the metro! And the easiest way to use the metro is to use... Google Maps.
Yes, that's really it. Just use Google Maps.
I can hear the Londoners raised on Citymapper screaming from here! The reason is that it's way better than anything else for the Tokyo metro specifically. You just put your origin and destination in and it tells you everything - which lines to take, how much it will cost, where to transfer, where on the train to stand, which exit to take.
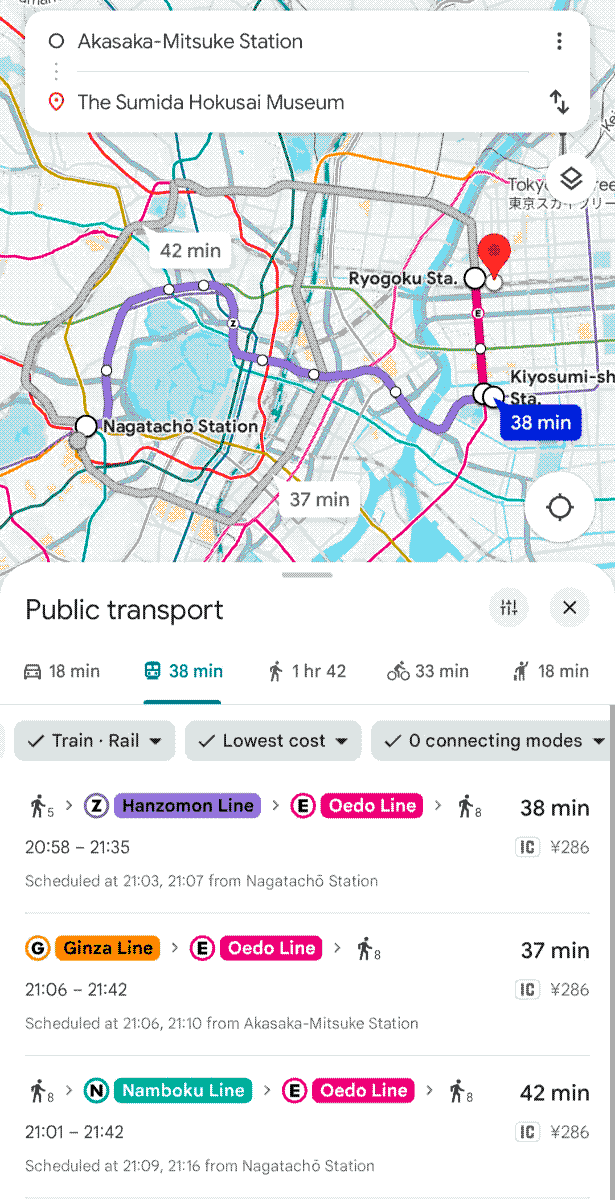 You can even adjust your settings to prioritise different modes of transport, or different things like the lowest cost, the fewest transfers or the least walking (see image). So if you just want to ride the metro without thinking too hard, Google Maps is the way to go. You can stop reading here if you want!
But what if you want to know more about the metro? In that case reader, here's what I have in store:
what is the metro?
The Tokyo metro is a mostly underground railway run by two companies: Tokyo Metro and Toei Subway (don't worry, this is mostly an administrative distinction! It doesn't make much difference apart from some kinds of tickets, and IC cards like Suica and Pasmo work on both).
It has 13 lines, each with a different colour:
- Tokyo Metro Chiyoda Line (千代田線), green
- Tokyo Metro Fukutoshin Line (副都心線), brown
- Tokyo Metro Ginza Line (銀座線), orange
- Tokyo Metro Hanzomon Line (半蔵門線), purple
- Tokyo Metro Hibiya Line (日比谷線), silver
- Tokyo Metro Marunouchi Line (丸ノ内線), red
- Tokyo Metro Namboku Line (南北線), teal
- Tokyo Metro Tozai Line (東西線), sky blue
- Tokyo Metro Yurakucho Line (有楽町線), gold
- Toei Asakusa Line (浅草線), rose
- Toei Oedo Line (大江戸線), magenta
- Toei Mita Line (三田線), dark blue
- Toei Shinjuku Line (新宿線), lime (brat) green
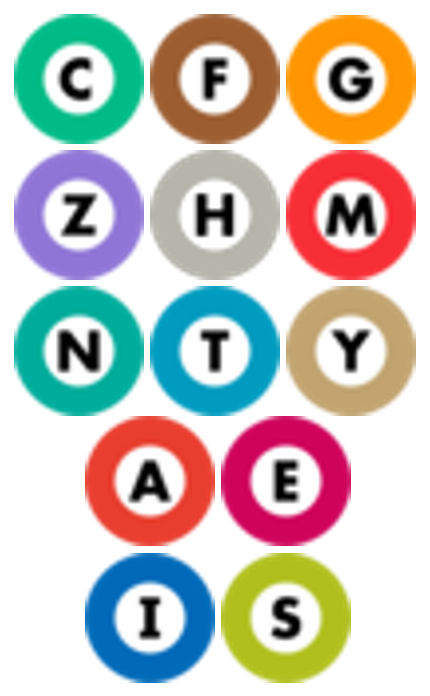
On signs, the lines are represented by a coloured circle with a letter inside (see above). The line name is usually written alongside in English and Japanese. Each station along the line is assigned a number, which sometimes appears within the circle. This makes it easy to navigate even if you don't know Japanese! More on navigation later.
Types of trains
There are a few types of train that run in the metro (and on the Japanese rail network in general). The most common are local trains and express trains:
- Local trains (in Japanese: 普通 futsuu or 各駅停車 kaku eki teisha) stop at every station on the line.
- Express trains (in Japanese: 急行 kyuukou) skip stops on the line.
There are also some other types of train, although these don't usually run on the metro (you might see them on other lines):
- Rapid/semi express/commuter express trains (in Japanese: 快速 kaisoku or 準急 jun-kyuu) skip some stops, but usually fewer than the express trains. Often they skip stops closer to the centre of Tokyo, then become a local train past a certain station.
- Rapid express trains (in Japanese: 快速急行 kaisoku kyuukou) skip even more stops than an express train.
- Limited/special express trains (in Japanese: 特急 tokkyuu) only stop at major stations, and sometimes need you to pay an extra fee if it's a nice looking train.
Most of the time you don't need to pay attention to whether a train is listed as local or express, as for most lines trains always stop at every station within the metro section. The few exceptions are:
- Asakusa Line: only the 'Airport Limited Express' and 'Access Express' trains skip stops, all the other express and local trains stop at every station on the line.
- Fukutoshin Line: express trains skip stops between Ikebukuro and Shibuya.
- Shinjuku Line: technically there are express trains but they only run in one direction in peak hours, so they're quite rare!
- Tozai Line: rapid trains skip stops at the east end of the line, way outside central Tokyo.
Through running + other trains
A useful feature of the Tokyo metro is that the trains on these lines often run onto other lines - for example, Hanzomon Line trains run past Shibuya (the end of the line) to Chuo-rinkan, a place near Yokohama. In lots of online guides to the metro, they make this sound very confusing, but actually it's very simple. At some point the train companies decided it would be convenient to run a joined-up service, so they built it. Kind of like how the Elizabeth Line in London has an underground middle section linking rail lines on either side of London. Most of the time it's useful and convenient, you just stay on the same train! When trains run onto another line (or when they don't), it's usually made pretty clear on the screens inside the train, on departure boards on platforms, and on Google Maps. Don't worry - just don't fall asleep and end up two hours away!
The metro is different to the JR lines, and other companies' train lines. You might have heard of the Yamanote Line, which is a loop line around the city run by Japan Railways (JR). Although it's basically a train just like the metro, navigating JR stations and lines is a little bit different, so I'm saving that for another guide. Or a subsection of this guide. Idk I'll decide later.
a quick note on the metro map:
unlike other, beautifully iconic metro maps around the world, I honestly wouldn't bother using the map of the Tokyo metro. It looks like rainbow spaghetti and is way too confusing. It's also different depending on which metro company made the map which is even more of a mess! Just use Google Maps lol
paying for the metro
Unfortunately, public transport isn't free here, unless you're under 6! But it's pretty cheap. There are a few ways of paying for the metro:
- Single paper tickets
- IC cards
- Time-based passes (eg 24hr)
I'll go through and explain each of these in turn. Starting with the easiest:
Single paper tickets
Honestly just don't bother with these. Who wants to go to a ticket machine, scratch your head at the map of train fares trying to work out which one you need to pay, and then pay in cash, every time you make a journey? Don't do it to yourself guys!
IC cards
Thiiiiis is what you want. IC cards are cards you load with money and tap at the ticket gates when you enter and exit, just like an Oyster card in London. They come in a few types (you might have heard of Suica, Pasmo, ICOCA, etc) but they all work across the vast majority of Japan, on buses, trains, trams, and more. And the cool thing is they're accepted in other places too - shops, vending machines, restaurants... you could probably just load up an IC card and use that instead of bank cards to be honest. The fares are also slightly cheaper than paper tickets because it's in 1 yen increments rather than 10 yen. Everyone needs their own card.
Somewhat annoyingly, physical IC cards can only be loaded with cash. But you can load them at convenience stores and 7/11 ATMs, so it's not too much of a hassle. You can also load them at ticket machines in stations, which are always by the ticket gates. And if you tap in but don't have enough money on the card to tap out at the other end, you can load them at fare adjustment machines (look for the yellow machines by the ticket gates).
That's where digital IC cards come in. If you're lucky enough to be an iPhone or Apple Watch user, your device has the magic chip which allows you to have IC cards in Apple Pay, and that means you can top them up digitally. Apple has a guide on how to do it here. Sadly if you're an Android pleb like me, for silly geopolitical reasons our phones have the chip but don't have it activated (unless you bought your phone in Japan) so we're stuck with physical cards for now.
Physical cards come in several types: tourist cards, normal cards, named cards, and commuter passes. In Tokyo, you can get Suica from JR stations, and Pasmo from Tokyo Metro, Toei and non-JR rail stations (e.g. Keikyu, Tokyo Monorail, Keisei, Tobu, etc).
The tourist cards (Welcome Suica) are valid for 28 days. They don't need a deposit and have a very cute design with sakura. You can get them at ticket vending machines or counters at Narita and Haneda airport train stations, where you can load them with cash. It's usually well signposted in English, look for the red 'Welcome Suica' signs.
Normal cards have a 500 yen deposit, but don't expire until 10 years after they were last used, so they're good if you think you'll come back to Japan. You can get them at most ticket machines and counters at stations where you can load them with cash. There was a chip shortage which meant they weren't available for a while, but they're back from the beginning of March 2025. If you want to turn in the card at the end of your trip, you can get your balance refunded (minus the deposit).
Named cards are exactly the same as normal cards, except they're registered to you personally. This means if you lose them, you can get the balance restored to a new card. You can only get them at certain ticket machines or ticket counters in major stations.
Finally, commuter passes are IC cards loaded with a monthly or yearly pass on a certain route, which is printed on the front of the card. You probably won't need these, but they can be bought at ticket machines. This is the only time that the type of card (Suica/Pasmo etc) matters because it has to match the train company of the commuter pass (e.g. if you're buying a commuter pass for JR, you need to do it at a JR station and it gives you a Suica).
Time-based passes
Both Tokyo Metro and Toei Subway offer time-based passes covering the entire Tokyo metro network, but not JR or other rail lines, exclusively for foreign tourists (passport required). They come in 24 hour, 48 hour and 72 hour variants and are really good value for money (800/1200/1500 yen) but you can only buy them from certain stations:
- Ginza station (tourist information centre/pass office)
- Iidabashi station (pass office)
- Ikebukuro station (Yurakucho line tourist information centre/pass office)
- Shinjuku station (tourist information centre/pass office)
- Takadanobaba station (pass office)
- Tokyo station (tourist information centre)
- Ueno station (tourist information centre/pass office)
- Ueno Okachimachi station (tourist information centre)
to the platform!
So, you have your IC card set up, and you're ready to ride the metro! This section will help you get to the station, through the ticket gates, and to the right train. It can be a bit overwhelming at first but just take it slow and you'll be fine!
Finding your station
The first step is finding your station. If you're using Google Maps it'll give you walking directions. Otherwise, major roads often have signposts to the nearest stations. Important: if you need to use the lift, ask Google Maps to give you the step free route before you start going to the station. It makes it a lot easier to find the lifts and make easier transfers.
What does a station look like? Most metro stations have several entrances. They will always be marked with a sign that looks like these (there are two kinds of sign because there are two train companies). They also usually make a distinctive biiiiing-bonnnngggg noise to help blind people navigate.
At the entrance there will be another sign (see image) saying which lines run from that station, using the coloured circles I mentioned earlier with the station number inside. Fun fact - they're listed in order of which line is the closest to that entrance! Sometimes stations have multiple names written on the sign - don't panic, that just means you can use them all from that entrance. Just make sure that the line you want to use and the direction you want to go is listed on the entrance, as sometimes you can only access certain lines or certain directions from certain entrances. All entrances/exits are labelled with a letter and/or a number.
Getting to the platform
Once you're in the station, you need to make your way to the line you want to use. Fortunately this is usually quite easy - you just follow the signs to the line you want (the coloured circle with the letter inside). It even tells you how far away the line is in metres. At some point you will reach the ticket gates. Check on the sign overhead that it is the right gate for your line, then just tap your IC card and head on in!
Once you're inside the gate, you need to find the right platform. It's the same principle - follow the coloured circle to your line, but this time you have to choose your direction too.
Unfortunately the metro here doesn't use directions (e.g. northbound, southbound, eastbound, westbound), they just list place names along the line to tell you which direction the train is going in. But it often also includes the station numbers to make things easier, and usually there is a sign like this showing the stations the train stops at. Just pay attention and be careful to take the right direction!
On the platform
Now you're on the platform, nice one! Here is what a platform looks like. They can be quite narrow in places, so make sure you wait for the train somewhere that's not too crowded or narrow - I usually walk away from the escalators a bit.
While waiting for the train, form or join the queue by the platform doors (this is often marked with stickers on the ground). Unlike the Tube where it's a bit of a free for all, here people are very orderly while waiting for the train. Also, if it's busy, take off your backpack and put it on your front now before you get in the train.
It doesn't really matter where you get on the train, but if you want to be efficient, you can choose the right car for the exit you want at the other end. Google Maps tells you which car you want, but you can do it the analogue way by looking for these signs (use Google Lens to translate it by taking a photo). Then, look at the platform doors or the stickers on the platform to see where to wait for that car - each car and door is numbered, e.g. car 2 door 3.
riding the metro
The train is coming! You will hear announcements in Japanese and then in English (if you're on Tokyo Metro... Toei only does Japanese for some reason), when the train is pulling in, and when the doors open. The English announcement usually says something like:
The [local/express] train bound for [destination] is arriving at Track [number]. Please wait behind the yellow warning blocks.
The Japanese announcements usually include a bit more detail. Here's what they say in case you're curious:
Soon, on Track [number], the [local/express] train [running through to x line] to [destination] with [number] cars will arrive. [Information about the service on whatever line it runs onto]. [Advice about whether to wait for the express if you're in a hurry]. Please wait behind the yellow warning blocks. Because there are places where there is a gap between the train and the platform, please be careful.
(when the doors open, an announcement is made in Japanese only)
[Station name]. [Station name]. There are places where there is a gap between the train and the platform. Please watch your step. The train on Track [number] is the [local/express] train [running through to x line] bound for [destination].
Boarding the train
Basic metro etiquette applies - wait for everyone to get off the train, then board. If it's busy, try to go in as far as possible. It's much less packed away from the doors!
Before the train departs, a departure melody will play. They're about 10 seconds long and have two main functions - reminding people which station they're at (aside from a few standard melodies, they're unique to each station), and telling you how long you've got to catch the train. My rule of thumb is: if the departure melody is still playing when you get to the platform, you've got time to get on if you're quick. Once the melody stops, you're too late and should wait for the next train. There is an announcement which says 'It is impossible to board, please stop'.
Important Japanese train etiquette alert: do NOT try to board the train when the doors are closing. It's not heroic or cool, it's annoying, dangerous and delays the train, which is taken very seriously here. It's never too long until the next one anyway.
On the train
On the train there are seats along the sides of the train, and lots of space to stand in the middle. The seats at the end of the carriage are priority seats, which you should offer to people who need them. (P.S. the most elite seat is the one at the end of a group of seats, where you can rest your head against the partition and take a nap)
If you're standing, make sure you hold onto a strap or handrail - the drivers sometimes make emergency stops! There is a pattern of where people stand. In the middle parts of the train (between the doors), people stand facing outwards, holding onto a hand strap, with their bags on their fronts or in the overhead rack. The area near the doors is more flexible, but make sure you're not in the way when people try to get off. When it's really busy, it's polite to get off to let people past, then get back on. The people on the platform should leave space for you to do this.
On the train, there are usually information screens, as well as announcements. The announcements are pretty similar to the ones on the platform, telling you the next stop (including the name and the number), the lines you can change to, and the side the doors will open. The screens aren't always there depending on the type of train, but they're very useful when they're there. When you're approaching a station, they will flash up a map of the platform and how to get to different exits or other lines, which gives you a head start on knowing where to go. Here's an example announcement from the Tozai Line, plus a bonus Youtube video of the information screens:
The next stop is: Otemachi, T09. Please change here for the Marunouchi Line, the Chiyoda Line, the Hanzomon Line, the Toei Mita Line, and the JR lines. The doors on the right side will open.
finding your exit (inc. finding lifts)
The most important thing when finding your exit is - don't panic, and look for the yellow signs!
When you get off the train, it can often be a sea of people which feels quite stressful if you don't know where you're going. No stress required - make your way to an area with space and wait for a moment, it gets a lot quieter very quickly as all the people in a rush go away. Then you can start looking for exit info. There is an incredible amount of information on the platform if you know where to look!
Exit information is always in yellow. There are two stages of exiting a station - using the right ticket gate, and using the right exit. If you used Google Maps, it should tell you which gate to follow (yellow!) signs for, then the exit you should take, usually highlighted in yellow.
If you aren't using Google Maps you can also do this the analogue way! On the platform, there are usually big yellow signs which have information about the layout of the platform and which escalators/stairs/lifts go where. On this sign, it often also has a list of the ticket gates, and which places you can go to from the exits at that gate. Find your destination, and then follow the yellow signs towards that gate. Outside the gate, there is usually a map of the local area with more specific information about which exits go where. Follow the same process - find your destination, and then follow the yellow signs to the exit. Awesome!
Finding lifts
If you need to use lifts, you follow the same process, but this time you need to make sure you're following exit signs for the lifts. Get off the train and wait a while for the crowds to clear. Then, look for the yellow signs with a lift symbol. As long as you follow the signs for the lifts you will be on the accessible route! There is usually also information around the lifts about the accessible (often called "barrier free") routes.
congrats you did it! (+ miscellaneous fun facts)